
Alright friends, today is the day. I’m sharing the soup to nuts details on my favorite day of the week -- Pizza Friday. This isn’t so much as an exact recipe post as it is a how-to guide -- a choose your own adventure, if you will -- for how to make pizza from scratch.
Since we have Pizza Friday every week in our home, I’m constantly switching things up, mixing around dough/cheese/sauce/topping combos. Sometimes there is a glut of garden produce that needs using so the pizza is piled high with veggies! Sometimes I’m out of my favorite sauce that I make in bulk and freeze smaller portions of and I need a quick and easy 5 minute sauce.
The Plan
I’m going to walk through my entire process so if you’re feeling called to add Pizza Friday to your meal plan but want to cut down on delivery or takeout...you’ve come to the right spot. We’re going to be going over dough options, different sauces, how to incorporate garden toppings without having a sad, soggy mess, how to preheat the oven, how long to bake, and what to bake the pizza on.
Read through the post in its entirety because there are different timing considerations and techniques to familiarize yourself with. You might be all, “Ugh, this is too long. Why is this chick writing 2,500 words about making pizza?”
Why Pizza?
- Pizza is my favorite food
- We have Pizza Friday every week so I've made a lot of pizzas. And a lot of mistakes! The only way you can learn.
- There are so many techniques, styles, tricks, schools of thought, etc. But that shouldn't scare you, it should excite you about all the (delicious) possibilities!
- I want to share all the little tricks I’ve picked up over the years, and I’m trying to include absolutely everything, even things I think might be stating the obvious. Knowledge is power, after all!
If you find yourself getting overwhelmed then pause, take a deep breath, and think about how delicious a homemade pizza will be and how badass and capable you will feel after making said pizza. And if you mess up? Well, there’s always delivery! One time just within the past year I forgot a crucial step in making my pizza dough — I left out the salt and didn’t realize until just before it was time to assemble the pizza. Yikes! But it happens to the best of us. My goal for this post is for everyone to feel empowered to make the most delicious pizza all from scratch and to maybe even create a little family tradition.


The Dough - Choices
First things first, I am a huge proponent of making your own dough. If you’re going to the trouble of making pizza at home, please take it one (easy) step further and make the dough yourself! I started off purchasing bags of dough from the supermarket, then upgraded to buying dough from a Brooklyn pizza joint around the corner from our apartment, but once I started making my own dough I’ve never turned back.
Just recently I picked up a couple of frozen crusts from Trader Joe’s to have in case of Pizza Friday emergencies -- you know, with a baby, things happen! I used one of them one night when I just totally forgot to make dough Friday morning and was truly appalled by how awful the crust tasted. I told Kristian I was ashamed of my pizza performance and only ate one slice. And I love Trader Joe’s! But nothing compares to the texture and flavor profile of homemade dough.
Hands-On Dough Version
When I started making my own pizza dough almost 10 years ago I began with a traditional dough that you need to break out a stand mixer to make. This recipe is from Isa Chandra’s Supervegan Fun Times cookbook: The dough is great! It served us well for many years. But sometimes you just want something easy, a set it and forget it version if you will.
Easiest Ever Pizza Dough - No Knead
Enter: Lazy Pizza Dough from Smitten Kitchen. That has been my bread and butter for a while now, because you can make it the night before, the morning of, or at noon on the day of your pizza night. You mix the dough up and leave it until ready to use! I leave my Cambro container in the oven, turned off, light on.
Sourdough Pizza
You can also use a sourdough pizza dough recipe, like from my friend Deanna at Homestead and Chill. I use this if I want a cast iron skillet pizza night, sort of deep dish style.
The Dough - Handling
Fair warning: homemade dough can be a little tricky to work with at first. It’s important to stick to your convictions and arm yourself with a well-floured surface. You’ve got this! At the first sign of stickiness, you must persevere. Dust some flour on as you shape the dough, and don’t worry about getting a perfectly circular pizza. Perfection is boring, and misshapen pizzas still taste delicious. That said, here are some tips and tricks for shaping your pizza dough:
- Prepare a large sheet of parchment paper for your dough and set aside. Sure, most recipes will tell you to use cornmeal on your pizza peel and slide it onto a pizza stone, but this can be an intimidating maneuver. Make your life easier and use parchment paper.
- Don’t use a rolling pin. You know all those wonderful bubbles in the dough? A rolling pin will smoosh them right out, and you can kiss your delightful artisanal pizza bubbles goodbye. That said, if you are having a nightmare of a time hand shaping -- I recommend watching a YouTube video if you’re shaping for the first time -- then by all means, break out the rolling pin. I’ve done it! Any port in a storm. Your mission is to cross the pizza finish line, and this can help. Be patient when shaping dough, she can be a fickle mistress.
- Shape dough on your floured surface then use a floured rolling pin to go from one side of the dough to the other, loosely wrapping the dough up like a cannoli shell (with the rolling pin being the ricotta cheese filling). Then, unfurl to transfer dough onto cornmeal dusted (or not, if you don’t enjoy it!) parchment paper.
The Sauce
Now, one of my horrible personality flaws is that I can be a terrible snob when it comes to homemade items. I’m working on it, I swear. But where it really comes out is jarred pizza sauce. It’s always loaded with sugar, devoid of flavor, and saltier than all get out. Much like you wouldn’t put regular old gasoline in a Ferrari (is that even right? I don’t know cars but I know there’s some saying like this.), why would you go to the trouble of making your own dough to cover it with Prego? No, no, no my friends. I cannot let that happen.
Again, Smitten Kitchen comes up with a clutch recipe for easy peasy tomato sauce -- ready in 5 minutes in the blender! I occasionally make this, but my usual sauce method is to get a big 5 lb can of whole peeled tomatoes from Wegman’s, make a huge batch of pizza sauce, and freeze it in smaller portions to use throughout a month or so.
I'm terrible at measurements when making the sauce recipe, so one day when I nail the amounts down I'll share the recipe in a post, but for now I'd recommend Ree Drummond's pizza sauce recipe. And though most tomato sauce recipes never call for it, I always add a squeeze of lemon juice at the very end. Why? Well, mainly because some baker on Great British Bake Off did it once and I thought it was brilliant, but I've since discovered that it's a common trick used by fancy chefs!
On Lemon Juice
Here's what Epicurious has to say on the matter:
"Does anybody else put lemon juice in tomato sauce?" asks this random person on an internet cooking forum. A couple people react cautiously, but others respond firmly in the affirmative. Lemon juice in tomato sauce? Are these folks nuts?
No, actually—they're onto something important, hip to a trick known widely to fancy chefs. Which is that just a little lemon juice, splashed into a dish at the very end of cooking, can be transformative. Even if its citrus notes are too subtle to notice, lemon adds a bright freshness, a finishing touch. It's an unheralded secret weapon.
"To Finish a Dish, Turn to the Humble Lemon" - Epicurious
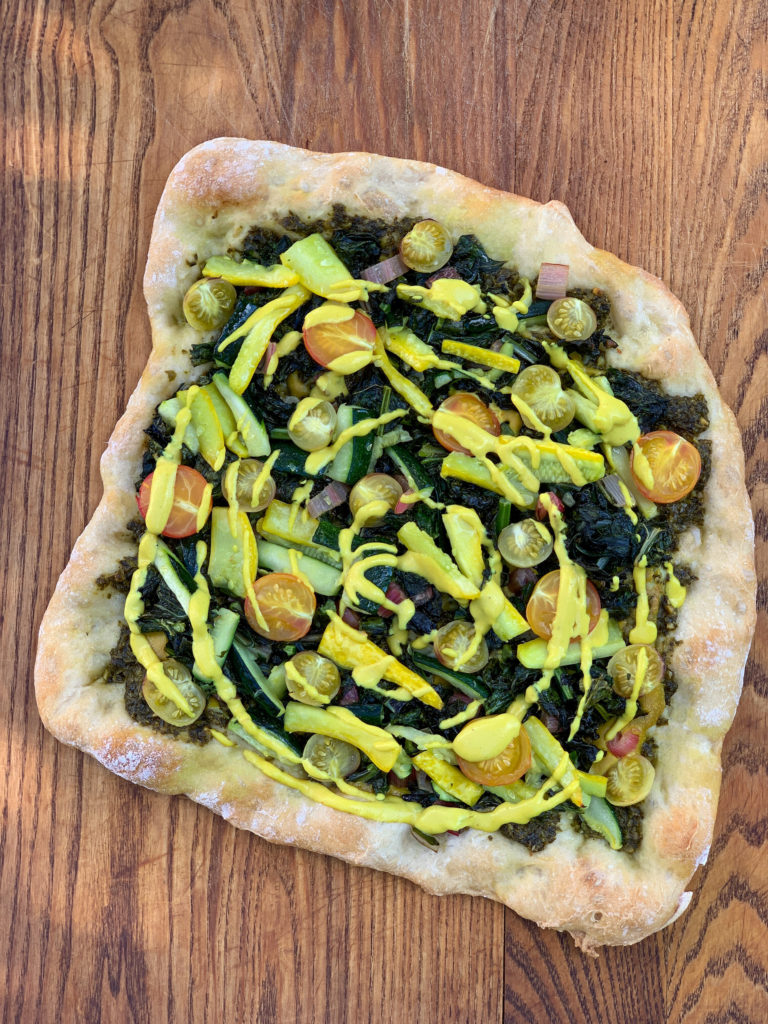
And sometimes, especially in the summer, my tum tum really wants a pesto pizza absolutely dripping in homemade pesto with basil fresh from the garden. Here's the vegan pesto recipe I use most of the time, but you're also welcome to use any other pesto recipe your heart desires.
The Cheese
Depending on what type of mood you’re in, there are a few different routes you can go for cheese. That old stalwart, shredded mozzarella, never ceases to wow the tastebuds. But perhaps you’re trying to cut back on dairy and are thinking, “Sigh, guess that means no pizza for me.” Oh contrair, mon petite chou! May I suggest checking out my cashew cream recipe, which has topped many, many a pizza over the years.
You can also go the fresh mozzarella route, but just keep in mind that it will add quite a bit of moisture to the pizza if you don’t towel it off a little bit.
The Toppings
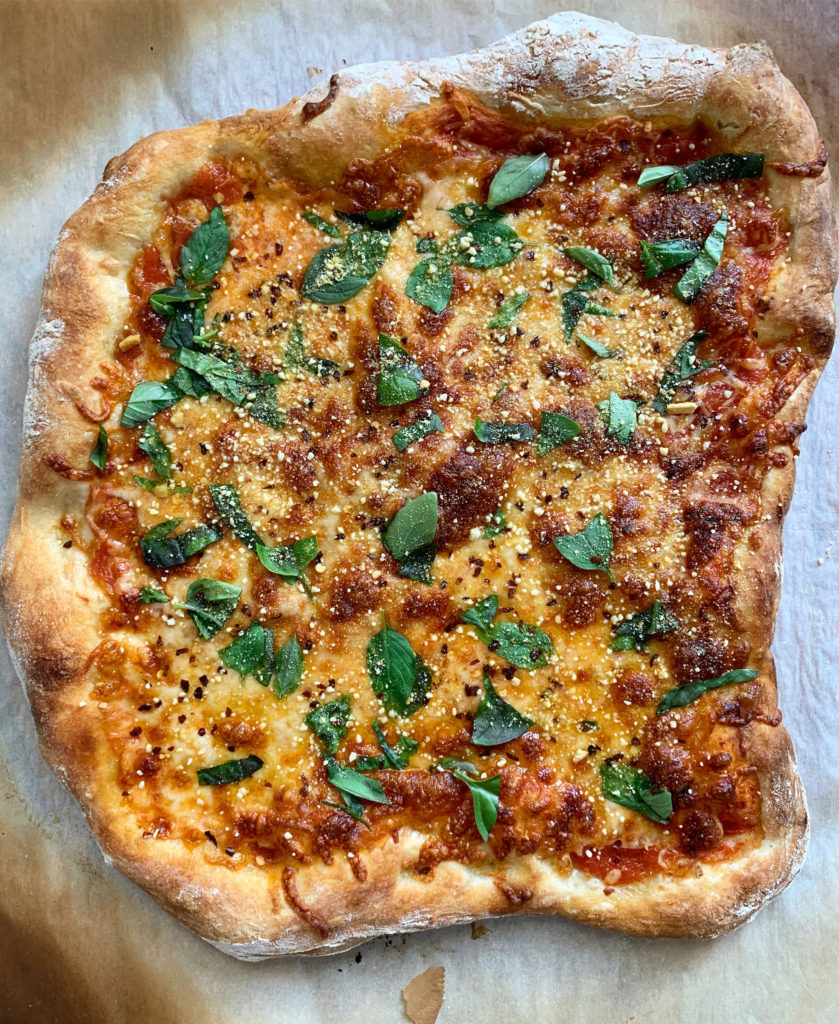
I would never dare make proclamations about what you should and should not put on pizza. To each his or her own, I say! For instance, I would never in a million years eat ham and pineapple pizza, but I will defend to the death your right to enjoy it. I usually keep it fairly simple with pepperoni or sometimes a vegan sausage, but in the summer when the garden is overflowing with fresh veggies I can't resist a loaded veggie pizza. Here's my favorite way to incorporate garden veggies:
- Harvest whatever sounds good -- I like to roll with Swiss chard, different types of kale, and some zucchini. Wash it, prep it, and slice it all up.
- If you're using zucchini, sprinkle a bit of salt on the sliced zukes and set them aside in a strainer over a bowl. You're going to be removing a ton of liquid from the zucchinis so you don't have a soggy mess of a pizza! Let the salt draw out moisture as you work with the greens next.
- Take your sliced up greens and sauté them in a bit of olive oil until nice and cooked down. Again, the idea is to remove moisture and pre-cook them so they don't burn in the oven. Set greens aside in another strainer and push with the back of a spoon to remove excess liquid.
- Go back to the zucchini and squeeze by hand to remove moisture, giving them a quick sauté as well.
- Now you're ready to add the toppings to your pizza. You'll get all the glorious nutrients without the extra cup or so of liquid from the veggies. Huzzah!
Baking
Okay, you’re armed with your dough, your sauce, your cheese, your toppings, and your newfound pizza making confidence. It’s game time! An hour before you want to make the pizza, place your pizza stone in the oven and preheat your oven to 500 degrees. Do you need a pizza stone? Nope, I know lots of folks who like to make pizza in a baking pan, and I myself like to futz with a cast iron skillet deep dish pizza every once in a while. But my go to pizza method is to cook it on a pizza stone. Why?
Compared to the metal of a baking sheet, the ceramic material of a pizza stone holds heat more evenly, and the porous surface draws water out of particularly wet areas of the dough as it cooks. Plus, when you preheat the stone, it gives the dough a strong burst of initial heat, puffing up the crust. A pan can't do that.
"Tested: Does a Pizza Stone Really Make a Better Crust?" - Popular mechanics
Par Baking
I always par bake my dough -- baking the naked dough for a few minutes and then adding sauce and toppings -- because I’ve found that helps with ensuring the dough is fully cooked through, which is especially important as you start to get crazy with loaded toppings.
To par bake dough, take your parchment paper with the rolled out pizza dough on top, slide a pizza peel underneath, and quickly slide it onto your pizza stone. Think of a quick flick of the wrist, like you’re tossing a frisbee. You have to commit fully to the transfer — the pizza can sense weakness! After the 5 minute timer is up, quickly slide the pizza peel under the parchment paper and remove dough from oven. If there’s a giant bubble or two that’s okay, they’ll deflate a bit. Be very careful to not pierce them as you’ll get blasted with 500 degree steam. I say this from experience. If you have an absolutely massive bubble you can gently poke it and continue on with adding sauce, cheese, and toppings.
Home Stretch
Next, you’re going to transfer the fully assembled pizza back to the oven. Set a timer for 12 minutes because depending on how many toppings you did, it can take anywhere from 12-15 minutes, so you’re going to check at the 12 minute mark. You want to look for just lightly golden crust, and at this point I like to slide the parchment paper out and let it go for another minute or so just on the pizza stone itself.
When you think it’s done, do another quick slide of the pizza peel and remove the pizza. To check if it’s done, use tongs to lift the edge of the crust up and slide a knife or metal spatula or something on the underside of the crust. You want to hear a little scratching on the center of the pizza crust, which indicates that it’s cooked through and won’t be soggy in the middle. If it’s not quite done, you can slide it back in the oven for another minute or two.
Thank you
PHEW! If you're still here after my long-winded pizza manifesto, then thank you. My whole goal with this post was to demystify the process of homemade pizza. Once you learn how to make pizza from scratch you'll wonder what took you so long -- it's just so incredibly satisfying to have this skill under your belt! Not to mention absolutely delicious. Good luck!
Leave a Reply